

10 Tips to Improve Security and Privacy in iOS 13
Saying iOS thirteen is feature-packed seems to exist an understatement. As someone who puts security and privacy over absurd customization, eye-communicable gimmicks, and crazy tweaks, I accept found the latest iteration of iOS to be a huge upgrade. That is non to suggest that the predecessors like iOS 12 or even 11 lacked the tools to safeguard sensitive data or prevent tracking. All I'1000 trying to emphasis is that iOS 13 appears to be in line with Apple'southward aggressive vision of creating a secure mobile operating system. And that's exactly what has compelled me to jot down some of the best tips to amend security and privacy in iOS xiii and of course the newly rolled out iPadOS xiii.
Best Tips to Heighten Security and Privacy in iOS xiii and iPadOS xiii
So, if the anonymous location tracking, grave profiling of user data or the condom of the sensitive files stored on your iPhone or iPad have forced yous to tighten upwards the shield, you have called the correct post to have you through the steps. In this long roster of tips, I have included most all the new privacy and security features of iOS 13. Too, I take also mentioned some of the very helpful features that take existed on iOS for long so that your personal files, iTunes & App Store purchases, and more get an ideal defense to ward off unauthorized access. With that said, let's dive across!
i. Deeply Sign in to Apps and Websites with Apple
From the privacy and security point of view, this i is probably the biggest iOS xiii characteristic. So, it's befitting to put this feature right at the elevation. It allows yous to quickly sign in to the supported apps and websites with the Apple ID. To prevent anyone from misusing your email, it creates and shares a unique e-mail ID with apps and likewise offers the option to hide your e-mail.
Plus, the built-in two-factor authentication shields your account against hacking. What'southward more, Apple says that it doesn't track or profile the information of the apps or websites you use. Considering how particular the tech giant is about security and privacy, yous can trust your information to stay safer and away from the prying eyes.
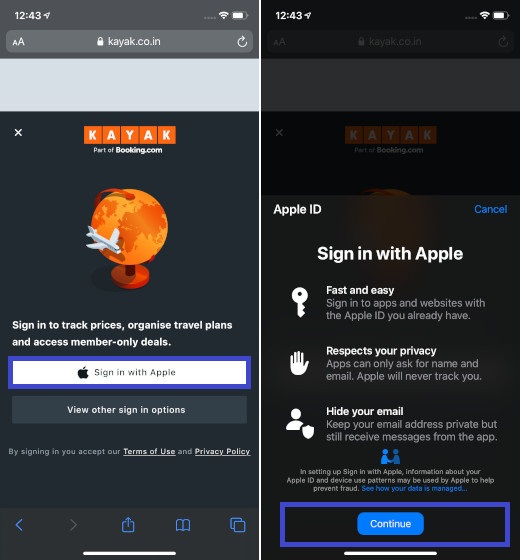
"Sign in with Apple" works with non only iOS 13, iPadOS 13, watchOS 6, macOS Catalina and tvOS 13 but also Android and Windows. So, it doesn't matter which platform yous are on, y'all tin can utilise this feature to sign in to apps and services securely. Keep in heed, your Apple ID must take 2-factor authentication enabled else you lot won't exist able to employ this security feature. Likewise, children under the age of xiii are not allowed to employ it.
If an app or website supports information technology, you should see a Sign in with the Apple push on the sign-in page. Though information technology automatically fills in your name and Apple ID, you can choose to edit your name and also show or hide your email. Then, you will need to authenticate using your Face or Impact ID.
2. Remove Location Metadata from Photos and Videos
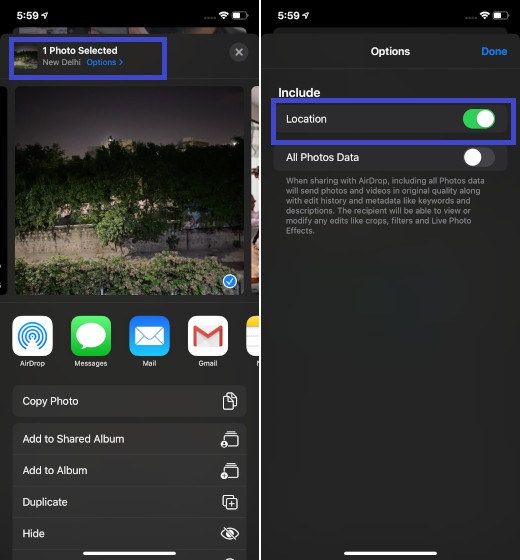
The next tip in line is about wiping out geotags earlier sharing photos and videos. Yeah, you could do it on earlier versions of iOS also using some workarounds but the process had never been so simple before. Keeping in mind the security threats, it's advisable to get rid of the location metadata earlier sharing the images on social networking sites like Facebook or Twitter. Simply open Photos app > Choose the images you desire to share > Share push button > Options > and then disable the switch that is placed right next to Locations. To find out more about it, head over to this quick guide.
3. Restrict iTunes & App Store Purchases
Well, the unexpected thing has happened with me many a fourth dimension – courtesy my three-twelvemonth-one-time child who never fails to attempt his hands on apps! On some occasions, he would trigger the download of many apps. On the other times, he would delete several apps. When these deportment became manner as well frequent, I decided to put an stop to them. And that'due south how I establish the option to restrict iTunes & App Store purchases quite helpful. Fifty-fifty if you don't manus over your device to kids, it'south always better to have restrictions on iTunes and App Store purchases so that no one can interfere with them.
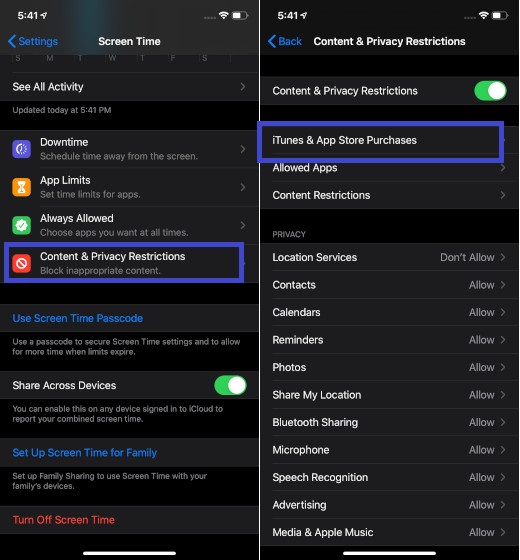
- Head over to the Settings app and tap on Screen Fourth dimension.
- Now, tap on Content & Privacy Restrictions (at present ensure that the switch for Content & Privacy Restrictions is turned on) and choose iTunes & App Store Purchases.
3. On the side by side screen, you lot should see three options under Shop Purchases and Re-Downloads. Tap on each option and so choose Don't Allow. Under Require Password section, choose Always Require.
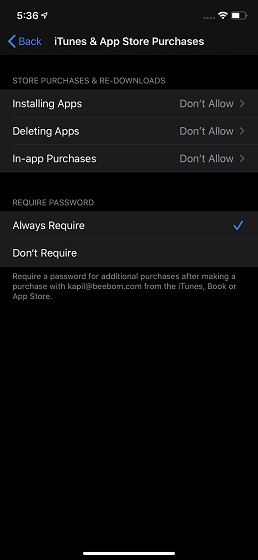
That'south it! Going forward, no one will be able to delete apps or install fifty-fifty costless apps without your permission.
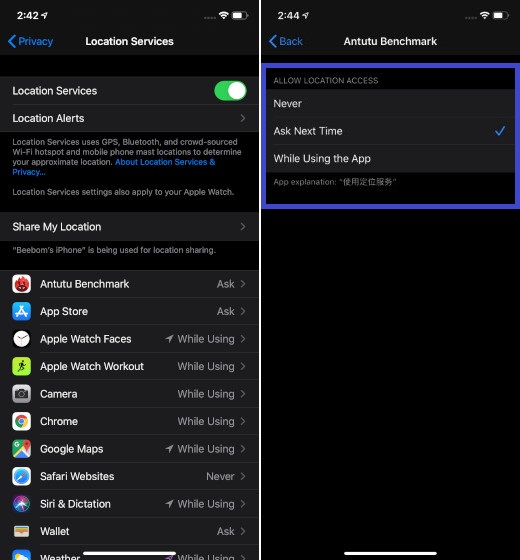
4. Share Your Location with Apps Only Once
With iOS thirteen, you can monitor how often apps are tracking you and also go to know the prime reason backside information technology. Whenever an app gets access to your location data, yous will receive a popup notification, giving a brief reason backside tracking your location. Besides, y'all will also go iii options to choose from:

- Permit While Using App: Let the app take access to your location information while you are using it.
- Allow Once: Allow the app to access your location only once.
- Don't Allow: Disallow the app from tracking your location.
Choose the second selection to let the app use your location information merely once. For more control, you can caput over to Settings > Privacy > Location Services > At present, tap on the specific app which location access you lot want to fine-tune. Then, choose the desired pick equally per your needs.
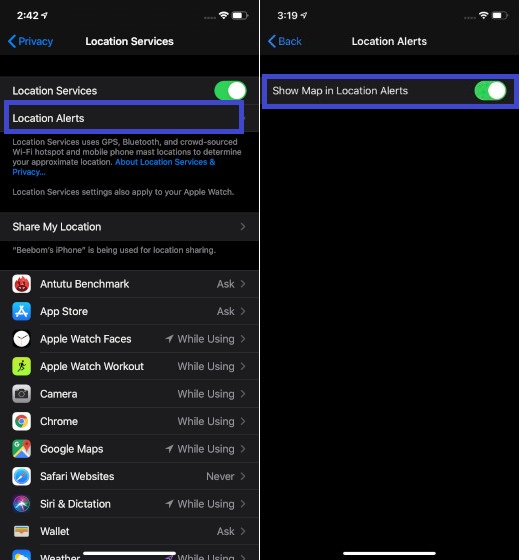
v. Location Alerts
Another notable security feature that has arrived in the latest iteration of iOS is Location Alerts. Whenever an app is tracking your location in the background, iOS will transport you a popup notification forth with the map of the location data that the app has used. Information technology is to ensure that you remain in consummate command of your data. So, make certain to keep this feature enabled to monitor the location data that any app uses. To exercise so, jump over to Settings > Privacy > Location Services > Location Alerts > Now, be sure that the toggle for Evidence Map in Location Alerts is on.
half-dozen. Restrict Store Content
iOS offers you lot cracking control over what sort of content you want to sentinel, read or access on your device. For case, y'all can choose to proceed explicit music, podcasts, books, and news out of sight. Also, there is also an choice to restrict the apps that are not designed for children. Well, this is exactly what you would similar to have to control the kind of content your children read or lookout on the iPhone or iPad.
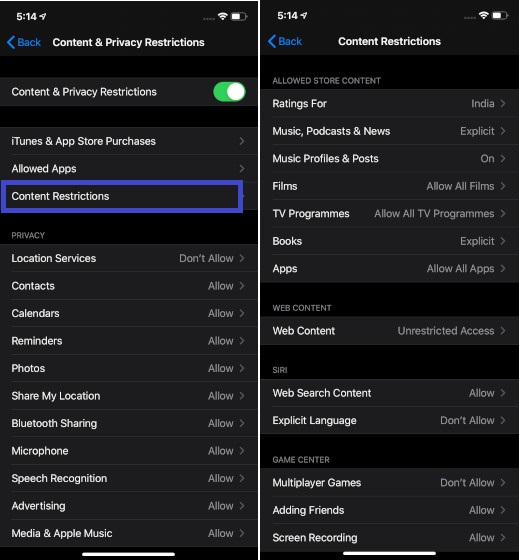
To restrict content, open Settings app > Screen Fourth dimension > Content & Privacy Restrictions > (make sure the toggle for Content & Privacy Restrictions is on) Content Restrictions. On this screen, you have a ton of options to customize restrictions on content. You tin can cull to gear up the ratings of content based on a specific country, limit adult websites, stop Siri from using an explicit language, and fifty-fifty end your kids from playing multiplayer games.
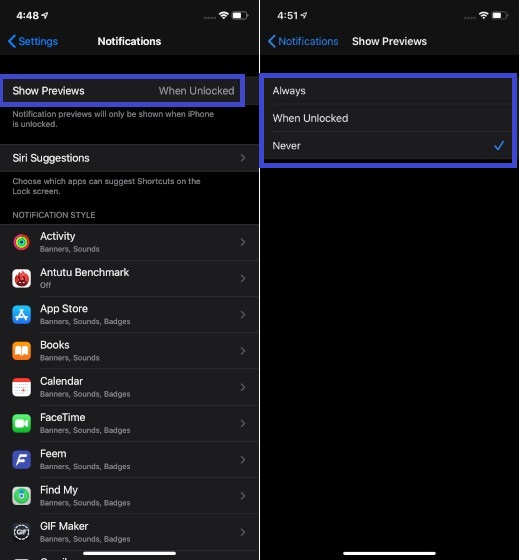
7. Hide Notification Previews
Individual conversations must have an boosted shield to remain away from the sight of those who enjoy sticking their olfactory organ into others' business concern. So, if y'all often indulge with some private messaging, y'all better hide notification previews. Information technology can go a long fashion in ensuring your letters stay away from snooping eyes. To do it, hop into Settings app > Notifications > Prove Previews > cull Never. Going forrard, the notifications will directly land into the respective apps.
8. Disallow Control Center Access from Lock Screen
From a convenience bespeak of view, it'south smashing to accept access to Control Centre right from the lock screen. But swipe upwards from the lesser edge of the screen or swipe downwardly from the tiptop right corner to bring up the control center and then have control of several things like brightness, ability fashion, internet connection, AirPlay quickly – without hoping to dive into the Settings app. That's as straightforward as information technology can ever get. But is information technology swell from a security perspective? I don't think so.
Anyone can access the Control Center of your device and make several changes fifty-fifty without your permission. If yous don't want anyone to tinker with the Control Centre, disallow CC access from Lock Screen. It's pretty unproblematic to do.
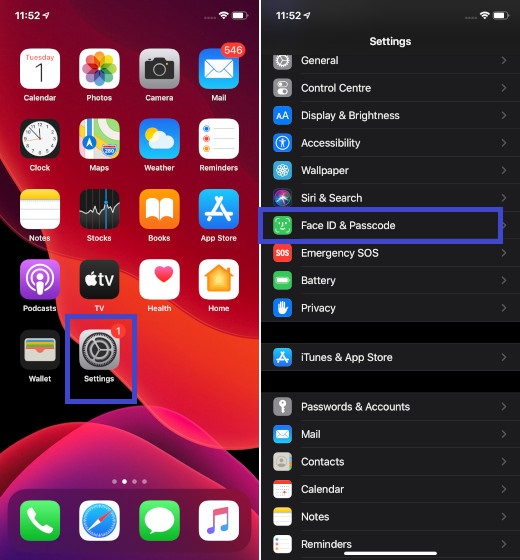
- Open the Settings app on your device and tap on Face up/Touch ID & Passcode. Then, you lot will need to enter your passcode.
2. Now, roll downwards to Let Access When Locked section. Next, plow off the switch for Control Centre.
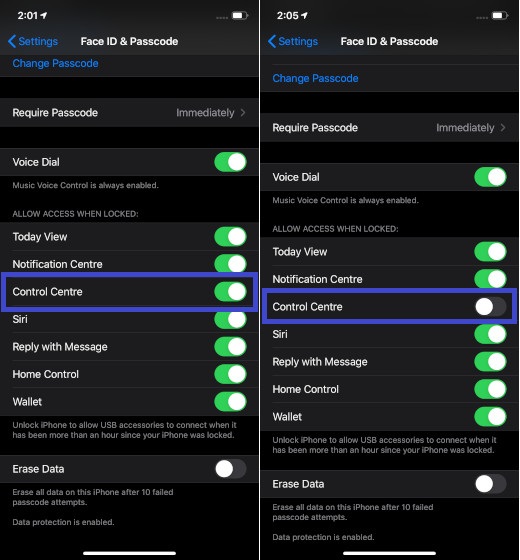
On this very section, you have the option to disable the access to many other features like Siri, Reply with Bulletin, Home Command, Wallet, Notification Centre, and Today View from the Lock screen. Depending on your needs, plow off the switches for respective features.
9. Disallow Changes to Location Services
Based on my preference, I customize all the settings including those of Location Services. And I want them to stay that fashion until I alter my mind. And then, any tinkering with the settings without my permission is unwarranted (oh, it even infuriates me no terminate). If you belong to the aforementioned school of thought, you would indeed appreciate this tip as it allows you lot to forestall anyone from making any changes to Location Services settings.
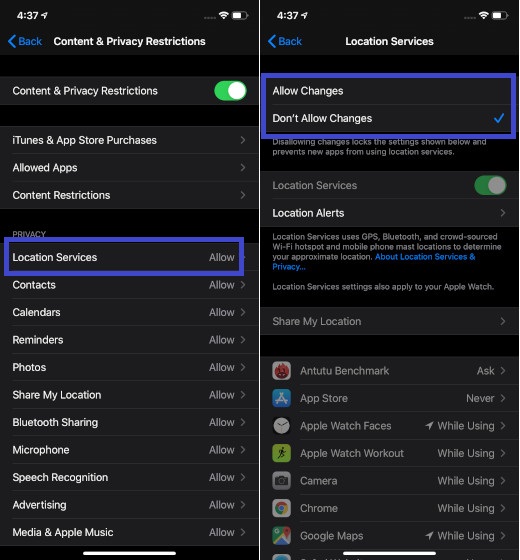
To get information technology done, all yous need to exercise is head over to Settings app > Screen Time > Content & Privacy Restrictions and brand certain the toggle for Content & Privacy Restrictions is on. Then, tap on Location Services under the Privacy department. Afterwards that cull, Don't Allow Changes.
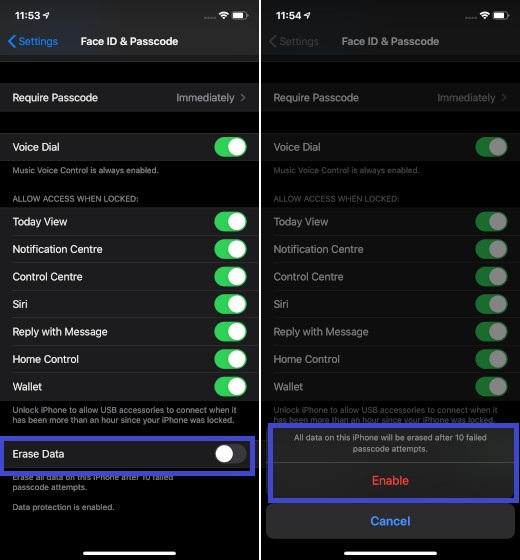
10. Automatically Erase Data After x Failed Passcode Attempts
Well, this security characteristic has existed on iOS for long. So, even if y'all are running an older version of iOS, you tin can take reward of it to safeguard your sensitive information from falling into the incorrect hands. What it does is automatically wipe out the unabridged data of your iPhone and iPad afterwards 10 failed attempts.
Information technology could plough out to be a savior of your data when your device is lost and someone tries to unlock it to access your personal files, photos, videos or annihilation that you accept stored. And so, practice not miss out on this one, if your priority lies with offering a strong shield to your sensitive data stored on the device.
- To automatically delete the data of your iOS device, open up the Settings app and and so tap on Face ID/Bear on ID & Passcode.
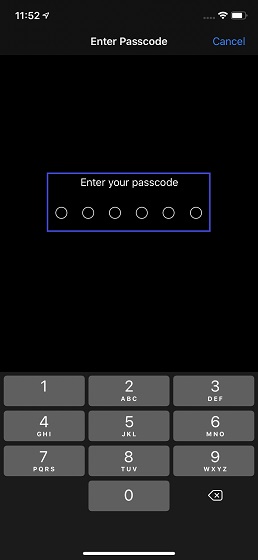
2. At present, enter the passcode of your device.
3. Next, gyre down and plow on the switch for Erase Data. Then, tap on Enable to confirm.
SEE Too: How to Enable Low Data Mode in iOS 13 on iPhone and iPad
Heighten Privacy and Security Using These iOS 13 Tips
And so, that's how you can double down on the privacy and security of your data by getting the most out of the features like Sign in with Apple tree and Location Alerts. Though nothing can guarantee you lot an impeccable shield to your personal info, these features can go a long way in keeping threats at bay. By the way, take I missed out on some important security features? Practise not forget to share them with me in the comments down below.

Source: https://beebom.com/improve-security-privacy-tips-ios-13/
Posted by: christianhaterequed.blogspot.com
0 Response to "10 Tips to Improve Security and Privacy in iOS 13"
Post a Comment